Friday, December 30, 2016

OUGD504 Studio Brief 02 - iOS 10 Design Guidelines for iPhone and iPad (RESEARCH)

iOS 10 Design Guidelines for iPhone and iPad (RESEARCH):
As I am designing an app for students I have decided to design it for an iPhone as this seems to be the most popular phone amongst students. Therefore I will need to follow some guidelines to ensure my app works cohesively with iOS.

I have taken some of the design guidelines that I may need to consider within my designs.

App Icon

The App Icon is used for the branding of your app. It’s the first thing that users see when they experience it. It appears prominently on the Home screen, the App Store, in Spotlight and Settings.


App icons have 2 resolutions now: @2x and @3x. There are 3 types: App Icon, Spotlight and Settings. For the iPad, @1x and @2x are used.


Super-Ellipse

Since iOS 7, the rounded corners have shifted from plain rounded corners to a super-ellipse shape. It is important to keep note that you shouldn’t export the icons with the mask, or you’ll potentially find black artifacts. Instead, just export square assets to the App Store.


Icon Grid

Apple applied a golden ratio on some of their icons. This ensures that the icons are the heroes while keeping good proportions.


Colours

iOS uses vibrant colours to bring out the buttons. These colours tend to work well against a white background as much as a black background. Keep in mind that colours should be used sparsely, for call-to-actions and minimal branding areas like the navigation bar. Roughly, only 10-20% of your design should have colours, or they will compete too much against the content.


iOS often uses neutral colours to serve as the background and menu areas. A well-contrasted black text against a white background is used to make the text comfortable to read. Finally, the pastel blue is applied for making the buttons stand out.


Button and Font Sizes

The general rule is 44pt for buttons and 12pt for small text, 17pt for body text and 20pt+ for titles.


Spacing and Alignment

A general rule is to have a minimum padding or margin of 8pt. This creates enough breathing room, which makes the layout easier to scan and the text more readable. Also, UI elements should be aligned and texts should have the same baseline position.


Status Bar

It is recommended to include the status bar in as many places as you can. Users rely on it for important information such as signal, time and battery. The text and icons can be white or black, but the background can be customised into any colour and merge with the Navigation Bar.


Tab Bar

The Tab Bar is the main navigation between multiple screens. Avoid the Hamburger menu if you have few items. Menus that are always visible will increase usage since obvious always win. Additionally, it is encouraged to add text next to your icons as most people won’t instantly recognise symbols, especially when they’re not universally known.


When they’re not active, icons will generally have an outline instead of being filled. Like this, they attract less attention.

Keyboards

The keyboard is used to input information in text fields such as search, chat or login. It’s highly customisable, for URL, Email, Phone numbers and even Emoji. You can choose between the Light and Dark themes, as well as how the action button is named (return being the default).


Picker

When you have multiple options to choose from, you can use the Picker control. It’s particularly useful for dates, which controls 3 fields in one action.


iOS Icons

These are the native icons that permeate iOS. Since they’re commonly used, they’re instantly recognised by users for their meaning. Using them for other purposes may confuse your users, so it’s important to be aware of how they’re used in iOS.


When you design custom icons outside of these, it is important to use well-known symbols. Additionally, I strongly recommend to always accompany them with a small text of 10pt or more.

RESOURCE:

WEB
- https://designcode.io/iosdesign-guidelines

OUGD504 Studio Brief 02 - Detailed Wireframes

Detailed Wireframes:
Thinking further about what my app is going to look like, I have sketched out more thorough wireframes to provide a clearer picture of my design.


The first sketch is what would appear as soon as you open the app. The logo would appear at the top of the page, and the different app buttons at the bottom (My Food, Calendar, Share and History). A search bar is at the top with a knife a fork icon below it. The second sketch shows what happens when you tap onto the search bar, the keyboard comes up from the bottom, and as each word is typed, separated by a space, it turns them into tags. As more items are typed in the search bar drops down to accommodate. The 3rd sketch shows the screen it would take you too once you have searched for the items. The number of matches would appear in the top right and a back button in the top left. Recipes will appear down the screen split half with image half with brief info about the recipe, also included is a rating of ease.


Next the first sketch depicts what would happen if you had tapped the 'My Food' icon. That icon would then change to a 'Home' icon. At the top is the title of the page you are on with a back arrow in the top left corner and a plus icon in the right to add items. Below this is a search bar, to search within the users own ingredients. Below are image icons for each button area. The next sketch shows the screen for the 'Fridge', but this layout will also be used for the 'Freezer' and 'Cupboards'. Again at the top you have a back arrow and title of page, below this another search bar specific to the fridge. Item names will list on the right hand side with the date of expiry on the right. The final sketch here shows the screen if you were to add or edit an item.


The first sketch here is the screen for the personal suggestions, a similar layout to the previous, with the names of items in a list format down the screen. If you tap on the item it will give you a recipe idea. This is what the 2nd sketch shows, there will be a large image of the food with a rating of ease below that, then some brief info on the recipe. Swipe right for ingredients and step by step guide on how to make. The final sketch shows the screen where you would scan in items using the camera of the phone. A green tick will appear when successfully scanned - option to then choose where to store the item.

From these wireframe sketches I have done a rough digital interpretation of the first two screens:


For the magnifying glass and the knife and fork icon I got them off a free website for icons, the only condition is if I used these in my final design would be to place the attribution on the credits/description page of the application.

Magnifying glass icon made by Madebyoliver from www.flaticon.com 

Knife and fork icon made by Freepik from www.flaticon.com 

Wednesday, December 28, 2016

OUGD504 Studio Brief 02 - Platter (RESEARCH)

Platter (Research):
While talking through my app idea with someone it was found that there is already an app out there that matches the ingredients you type in, with a recipe. However trying to search for it within the app store I was unsuccessful, the only thing that I could find is some articles and screenshots online.


Primarily this is a social app, sharing the foods you love to eat. To add a new dish, you need to snap a photo, pick a title and tag the ingredients you used.


Just like other social media sites you have followers and you can 'like' dishes. This allows for a more simple understanding as people will feel that sense of familiarity.


Platter has a simple, sleek design using minimal colours of only grey and black. The stylised font is playful and adds some fun to the design. Platter’s search will bring up dishes, but also specific ingredients. Platter takes this idea a step further with its Cupboard feature, which lets you enter all the ingredients you have on hand and then matches them up to dishes on Platter.


A website was linked within one of the articles found but it only seemed to be a food blog with no information about the app. Further looking through google images I found what I think is the iphone version of the app. This took me to a website displaying the information about the app but again I cannot seem to access it from anywhere.


As there seems to be very little information out there for this app I want to try and redesign it with my own idea for the app but keeping their name and sticking with similar design features. The reason that I am going to do this is because I want to create an app that appeals to students but still uses the feature of searching for ingredients. I want to redesign it with this target audience in mind to produce something that will stand out amongst other food apps.


RESOURCE:

WEB
- http://www.androidstatic.com/platter-is-a-social-app-for-geeky-foodies/

- http://www.thegoodwebguide.co.uk/food-wine/table-talk/food-app-of-month/Food-blog-of-month-June-Platter/14487

- http://platterhq.com/

- http://www.148apps.com/app/499546604/

Tuesday, December 27, 2016

OUGD504 Studio Brief 02 - History Icon (DESIGNS)

History Icon (Designs):
I've done a couple of sketches that I think that represent the history icon.


From my sketches I have taken a couple of the ideas and created basic outlines within illustrator.

1. For this design I have taken an timer to indicate the passing of time, however this could be confused on a cooking app, that it is going to time something.


2. This is a standard icon to represent history, something that is used within internet browsers, it is a clear simple design.


3. Again I have used the arrow but by adding clock hands I think that it makes the design a lot clearer, to indicate something in the past.


Feedback:
It was agreed during the feedback that the 1st design would not be appropriate as it could be confused with something else (an actual timer). The third design was the most preferred as it was completely clear what it is representing.

From this feedback I have decided to work further with the third design. 

Monday, December 26, 2016

OUGD504 Studio Brief 02 - Shopping List Icon (DESIGNS)

Shopping List Icon (Designs):
From my sketches I have taken a couple of the ideas and created basic outlines within illustrator.

1. This is a simple and clear design that I believe would work really well being extremely recognisable.


2. Again I think this is simple and clear to communicate shopping.


Feedback:
The feedback that I received was generally positive about both designs, the first clearly representing the shopping list aspect. The second clearly representing the link to the online shop. However the first design was preferred because the shopping basket suggests you can buy something within the app which it does not do.

From the feedback I think that I agree, it would be more appropriate to represent the icon as a list rather than a shopping basket which is usually represented when buying items.

OUGD504 Studio Brief 02 - Calendar Icon (DESIGNS)

Calendar Icon (Designs):
From my sketches I have taken a couple of the ideas and created basic outlines within illustrator.

1. I have gone for a curved friendly design with a corner turned up. 


2. For this design I have kept the original calendar shape with the ring binder design.


3. Taking the idea from the first design and applying it to a different shape.


4. Lastly I have kept the simple square design but have added an abbreviation of the month at the top, this is something I could possibly consider adding into the other designs.


Feedback:
From the feedback that I received the second and the fourth one were preferred due to looking the most like actual calendars. Because they are the clearest this would make it recognisable to a wider audience. It did not seem to matter much whether the calendar had the month on it, a reminder of the day would be enough.

From the feedback I have decided to work further with the 4th design, however I still like the old school look of the second one, as well as it being extremely clear what it is.

OUGD504 Studio Brief 02 - Share Icon (DESIGNS)

Share Icon (Designs):
From my sketches I have taken a couple of the ideas and created basic outlines within illustrator.

1. This is a well known icon for sharing, it would be easily recognised and could be stylised in different ways. However I am struggling to reduce the weight of the arrow head, although this does stand out very clearly.

2. This is the icon generally used for sharing within iOS, it has a simple, minimalistic design that would fit in with other icons.

3. Next I have placed the word share within a rectangle, which is clearly the most obvious response and no one would misinterpret it. I don't know whether the shape would take up too much room on the screen when it isn't the most important icon.


4. I have got two people connected by the line to simulating sharing, I do like how this is different and something that isn't used as much. However, I don't think at a smaller scale it would be clear what it is.


Feedback:
The first design was preferred as this is something that they have seen before and is clear and obvious what it is portraying. The 3rd design was not seen to be appropriate because it would not scale down well, the writing would become illegible. Also because it is a rectangular shape it would take up space that other icons could use. Lastly the 4th design was generally liked although people were unsure how it would work at a smaller scale and maybe that it wouldn't be instantly recognisable to people that didn't know what it was meant to be.

From this feedback i've decided that the first design will be the most appropriate to work with. I want to choose something that is clear and instantly recognisable, and as this is commonly used I know that it works well.

Sunday, December 25, 2016

OUGD504 Studio Brief 02 - My Food Icon (DESIGNS)

My Food Icon (Designs):
From my sketches I have taken a couple of the ideas and created basic outlines within illustrator.

1. I've used rounded edges to create a fridge/freezer, the design is simple and clear, it can instantly be recognised for what it is. However, I am unsure whether this makes a good representation of the my food area.

2. Again i've taken the fridge/freezer but i've kept the hard rectangular edges, as well as adding more detail to make the design clearer. However when the design is scaled down I am unsure whether it will be clear as to what it is, this is something I will need to test and consider.

3. Lastly because I felt that it was quite hard to define food storage as just being a fridge/freezer, I have taken just the letter 'F' to represent food and placed it in a square box. Possibly this work the best and it is clear and easy to understand.

Feedback:
Showing the three designs to other people the first two designs were preferred as the fridges seem clear to show that they are an area of food storage. The third design seems to vague as 'F' could stand for anything. At a smaller scale the first designs rounded edges do not seem to work as it begins to change shape that doesn't look like a fridge anymore. Therefore it was felt that the second design would be the most clear and appropriate, as well as working better at a smaller scale.

From the feedback I have decided to work more with the second design.

OUGD504 Studio Brief 02 - Icons (RESEARCH)

Icons:


In multimedia, an icon is a symbol of graphic representation of a program, option or window. They are simple and clear designs that can instantly be recognised. You should be able to tell what the icon is without out any word clues.


5 Tips for Designing the Perfect Mobile App Icon:


1. Use a unique shape or symbol - an icon that's instantly recognizable on search listing pages and a user's screen.


2. Keep it simple - the best icons focus on one element or concept rather than trying to jam every feature into a tiny icon. 


3. Don't include words - Long words are hard to read in such a small space when it's sitting alongside a bunch of other icons. Instead, opt to use just the first letter of your company or brand instead.


4. Choose vibrant colours - Make sure that my app icon looks good on a variety of different backgrounds. Using vibrant colours will help my app stand out both against the other apps a user has installed and against his or her background image. 


Choose your icon colour carefully. Blue is the most common favourite colour in the world, so companies have capitalised on this and many app icons are blue. However, by choosing blue for my icon I risk blending in with the competition.


5. Create several versions of my app icon - Testing a new icon in the app store itself -- by using volume of app downloads to gauge your success -- is risky because it takes an average of nine days to get your app re-approved. So if you see a sudden drop upon updating your app icon, it could take about nine days to revert to your previous app icon if the new one fails.


RESOURCE:

WEB
- http://digitalsafari.pbworks.com/w/page/105290646/09%20Icons

- http://info.localytics.com/blog/tips-for-designing-the-perfect-mobile-app-icon

OUGD504 Studio Brief 02 - Production Decisions (RESEARCH)

Production Decisions:

COLOUR 

Colour codes are ways of representing the colours we see everyday in a format that a computer can interpret and display. Commonly used in websites and other software applications, there are a variety of formats, including Hex colour codes, RGB and HSL values, and HTML colour names, amongst others.

Hex colour codes:
The most popular are Hex colour codes; three byte hexadecimal numbers (meaning they consist of six digits), with each byte, or pair of characters in the Hex code, representing the intensity of red, green and blue in the colour respectively.

Hex code byte values range from 00, which is the lowest intensity of a colour, to FF which represents the highest intensity. The colour white, for example, is made by mixing each of the three primary colours at their full intensity, resulting in the Hex colour code of #FFFFFF.


Black, the absence of any colour on a screen display, is the complete opposite, with each colour displayed at their lowest possible intensity and a Hex colour code of #000000.


Understanding the basics of Hex colour code notation we can create grayscale colours very easily, since they consist of equal intensities of each colour:


The three primary colours, red, green and blue, are made by mixing the highest intensity of the desired colour with the lowest intensities of the other two:


With modern browsers supporting the full spectrum of 24-bit colour, there are 16,777,216 different colour possibilities.

The most commonly used colour on the internet is blue, this is something I could take into consideration.

TYPOGRAPHY

Web safe fonts:

Sans-serif fonts
- Arial
- Helvetica
- Verdana
- Tahoma 
- Comic Sans
- Impact

Serif fonts
- Times
- Times New Roman
- Georgia
- Palatino
- Bookman
- Garamond
- Century Schoollbook

Monospace fonts
- Courier
- Courier New
- Andale mono

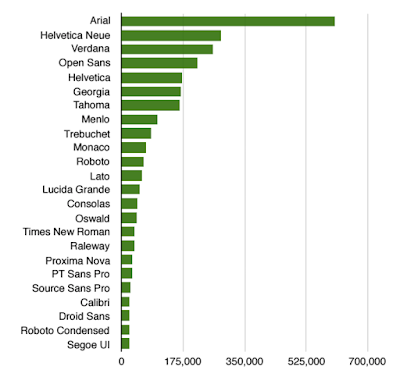
Most commonly used fonts:


12pt type minimum for screen and making sure there is about 8-12 words per line.

LAYOUT/GRIDS
Primarily with web pages a 12 column grid is used.


RESOURCES:

LECTURE

WEB
- http://htmlcolorcodes.com/